Lesson 2: Simple Comparative Experiments
Lesson 2: Simple Comparative ExperimentsOverview
This lesson should be a review for most students who have the required prerequisites. We included it to focus the course and confirm the basics of understanding the assumptions and underpinnings of estimation and hypothesis testing.
Objectives
- review basic statistical concepts
- review sample size calculation for two sample problems based on the t-test
- review the difference between two independent samples and paired comparison design
- review the assumptions underlying the t-test and how to test for these assumptions
2.1 - Simple Comparative Experiments
2.1 - Simple Comparative ExperimentsSimple comparative experiments are not only preliminary to this course but this takes you back probably into your first course in statistics. We will look at both hypothesis testing and estimation and from these perspectives, we will look at sample size determination.
Two Sample Experiment
Here is an example from the text where there are two formulations for making cement mortar. It is hard to get a sense of the data when looking only at a table of numbers. You get a much better understanding of what it is about when looking at a graphical view of the data.
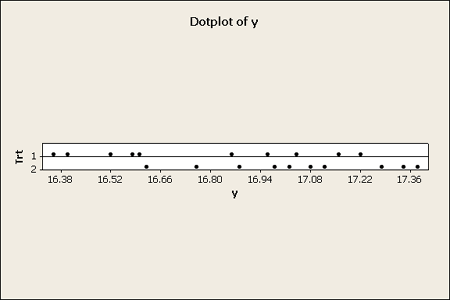
Dot plots work well to get a sense of the distribution. These work especially well for very small sets of data.
Another graphical tool is the boxplot, useful for small or larger data sets. If you look at the box plot you get a quick snapshot of the distribution of the data.
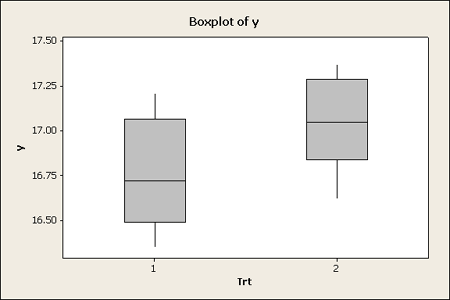
Remember that the box spans the middle 50% of the data (from the 25th to the 75th percentile) and the whiskers extend as far out as the minimum and maximum of the data, to a maximum of 1.5 times the width of the box, or 1.5 times the Interquartile range. So if the data are normal you would expect to see just the box and whisker with no dots outside. Potential outliers will be displayed as single dots beyond the whiskers.
This example is a case where the two groups are different in terms of the median, which is the horizontal line in the box. One cannot be sure simply by visualizing the data if there is a significant difference between the means of these two groups. However, both the box plots and the dot plot hint at differences.
Testing: The two sample t-test
For the two-sample t-test, both samples are assumed to come from Normal populations with (possibly different) means \(\mu_i\) and variances \(\sigma^2\). When the variances are not equal we will generally try to overcome this by transforming the data. Using a metric where the variation is equal we can use complex ANOVA models, which also assume equal variances. (There is a version of the two sample t-test which can handle different variances, but unfortunately, this does not extend to more complex ANOVA models.) We want to test the hypothesis that the means \(\mu_i\) are equal.
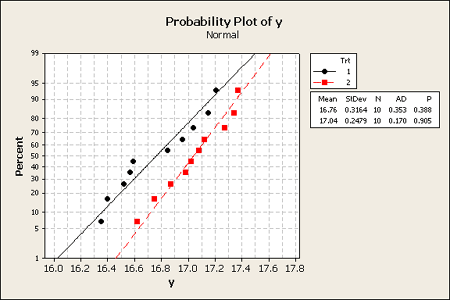
Our first look at the data above shows that the means are somewhat different but the variances look to be about the same. We estimate the mean and the sample variance using formulas:
\(\bar{y}=\dfrac{\sum\limits_{i=1}^n y_i}{n} \;\;\; \text{and}\;\;\; s^2=\dfrac{\sum\limits_{i=1}^n (y_i-\bar{y})^2}{n-1}\)
We divide by n - 1 so we can get an unbiased estimate of \(\sigma^2\). These are the summary statistics for the two sample problem. If you know the sample size, n, the sample mean, and the sample standard deviation (or the variance), these three quantities for each of the two groups will be sufficient for performing statistical inference. However, it is dangerous to not look at the data and only look at the summary statistics because these summary statistics do not tell you anything about the shape or distribution of the data or about potential outliers, both things you'd want to know about to determine if the assumptions are satisfied.
The two sample t-test is basically looking at the difference between the sample means relative to the standard deviation of the difference of the sample means. Engineers would express this as a signal to noise ratio for the difference between the two groups.
If the underlying distributions are normal then the z-statistic is the difference between the sample means divided by the true population variance of the sample means. Of course, if we do not know the true variances -- we have to estimate them. We, therefore, use the t-distribution and substitute sample quantities for population quantities, which is something we do frequently in statistics. This ratio is an approximate z-statistic -- Gosset published the exact distribution under the pseudonym "Student" and the test is often called the "Student t" test. If we can assume that the variances are equal, an assumption we will make whenever possible, then we can pool or combine the two sample variances to get the pooled standard deviation shown below.
Our pooled statistic is the pooled standard deviation \(s_p\) times the square root of the sum of the inverses of the two sample sizes. The t-statistic is a signal-to-noise ratio, a measure of how far apart the means are for determining if they are really different.
Does the data provide evidence that the true means differ? Let's test \(H_0 \colon \mu_1 = \mu_2\)
We will now calculate the test statistic, which is
- 2-sample t-Test Statistic
- \(t=\dfrac{\bar{y}_1-\bar{y}_2}{S_p \sqrt{\dfrac{1}{n_1}+\dfrac{1}{n_2}}}\)
This is always a relative question. Are they different relative to the variation within the groups? Perhaps, they look a bit different. Our t-statistic turns out to be -2.19. If you know the t-distribution, you should then know that this is a borderline value and therefore requires that we examine carefully whether these two samples are really far apart.
We compare the sample t to the distribution with the appropriate d.f.. We typically will calculate just the p-value which is the probability of finding the value at least as extreme as the one in our sample. This is under the assumption of the null hypothesis that our means are equal. The p-value in our example is essentially 0.043 as shown in the Minitab output below.
Two-Sample T-test and CI:y, Trt
Two-sample T for y
| Trt | N | Mean | StDev | SE Mean |
|---|---|---|---|---|
| 1 | 10 | 16.764 | 0.316 | 0.10 |
| 2 | 10 | 17.042 | 0.248 | 0.078 |
Difference = mu(1) - mu(2)
Estimate for difference: -0.278
95% CI for difference: (-0.546, -0.010)
T-Test of difference = 0 (vs not =): T-Value = -2.19 P-Value = 0.043 DF = 17
Normal probability plots look reasonable.
Confidence intervals involve finding an interval, in this case, the interval is about the difference in means. We want to find upper and lower limits that include the true difference in the means with a specified level of confidence, typically we will use 95%.
In the cases where we have a two-sided hypothesis test which rejects the null hypothesis, then the confidence interval will not contain 0. In our example above we can see in the Minitab output that the 95% confidence interval does not include the value 0, the hypothesized value for the difference, when the null hypothesis assumes the two means are equal.
2.2 - Sample Size Determination
2.2 - Sample Size DeterminationThe estimation approach to determining sample size addresses the question: "How accurate do you want your estimate to be?" In this case, we are estimating the difference in means. This approach requires us to specify how large a difference we are interested in detecting, say B for the Bound on the margin of error, and then to specify how certain we want to be that we can detect a difference that large. Recall that when we assume equal sample sizes of n, a confidence interval for \(\mu_1-\mu_2\) is given by:
\(\left\{\bar{Y}_1-\bar{Y}_2 \pm t(1-\alpha/2;df)\cdot s\cdot \sqrt{\frac{2}{n}}\right\}\)
Where n is the sample size for each group, and df = n + n - 2 = 2(n - 1) and s is the pooled standard deviation. Therefore, we first specify B and then solve this equation:
\(B=t(1-\alpha/2;df)\cdot s\cdot \sqrt{\frac{2}{n}}\)
for n. Therefore,
\(n=\left[t(1-\alpha/2;df)\cdot s\cdot \frac{\sqrt{2}}{B}\right]^2=\left[\dfrac{t^2(1-\alpha/2;df)\cdot s^2\cdot 2}{B^2}\right]\)
Since in practice, we don't know what s will be, prior to collecting the data, we will need a guesstimate of \(\sigma\) to substitute into this equation. To do this by hand and we use z rather than t since we don't know the df if we don't know the sample size n - the computer will iteratively update the d.f. as it computes the sample size, giving a slightly larger sample size when n is small.
So we need to have an estimate of \(\sigma^2\), a desired margin of error bound B, that we want to detect, and a confidence level 1-\(\alpha\). With this, we can determine the sample size in this comparative type of experiment. We may or may not have direct control over \(\sigma^2\), but by using different experimental designs we do have some control over this and we will address this later in this course. In most cases, an estimate of \(\sigma^2\) is needed in order to determine the sample size.
One special extension of this method is when we have a binomial situation. In this case where we are estimating proportions rather than some quantitative mean level, we know that the worst-case variance, p(1-p), is where p (the true proportion) is equal to 0.5 and then we would have an approximate sample size formula that is simpler, namely \(n = 2/B^2 \text{ for } \alpha = 0.05\).
Another Two-Sample Example – Paired Samples
In the paired sample situation, we have a group of subjects where each subject has two measurements taken. For example, blood pressure was measured before and after a treatment was administered for five subjects. These are not independent samples, since for each subject, two measurements are taken, which are typically correlated – hence we call this paired data. If we perform a two-sample independent t-test, ignoring the pairing for the moment we lose the benefit of the pairing, and the variability among subjects is part of the error. By using a paired t-test, the analysis is based on the differences (after – before) and thus any variation among subjects is eliminated.
In our Minitab output, we show the example with Blood Pressure on five subjects.
By viewing the output, we see that the different patients' blood pressures seem to vary a lot (standard deviation about 12) but the treatment seems to make a small but consistent difference with each subject. Clearly, we have a nuisance factor involved - the subject - which is causing much of this variation. This is a stereotypical situation where because the observations are correlated and paired and we should do a paired t-test.
These results show that by using a paired design and taking into account the pairing of the data we have reduced the variance. Hence our test gives a more powerful conclusion regarding the significance of the difference in means.
The paired t-test is our first example of a blocking design. In this context, the subject is used as a block, and the results from the paired t-test are identical to what we will find when we analyze this as a Randomize Complete Block Design from lesson 4.
2.3 - Determining Power
2.3 - Determining PowerWe begin this part by defining the power of a hypothesis test. This also provides another way of determining the sample size. The power is the probability of achieving the desired outcome. What is the desired outcome of a hypothesis test? Usually rejecting the null hypothesis. Therefore, power is the probability of rejecting the null hypothesis when in fact the alternative hypothesis is true.
| Decision | \(H_0\) | \(H_A\) |
|---|---|---|
| Reject Null Hypothesis |
Type I Error - \(\alpha\)
|
OK |
| Accept Null Hypothesis | OK |
Type II Error - \(\beta\) |
P(Reject \(\mathbf{H_0}\) | \(\mathbf{H_0}\) is true) = \(\alpha\): P(Type I Error)
P(Accept \(\mathbf{H_0}\) | \(\mathbf{H_A}\) is true) = \(\beta\): P(Type II Error)
Therefore the power of the test is P(Reject \(\mathbf{H_0}\) | \(\mathbf{H_A}\) is true) = 1-\(\beta\).
Before any experiment is conducted you typically want to know how many observations you will need to run. If you are performing a study to test a hypothesis, for instance in the blood pressure example where we are measuring the efficacy of the blood pressure medication, if the drug is effective there should be a difference in the blood pressure before and after the medication. Therefore we want to reject our null hypothesis, and thus we want the power (i.e. the probability of rejecting the \(\mathbf{H_0}\) when it is false) to be as high as possible.
We will describe an approach to determine the power, based on a set of operating characteristic curves traditionally used in determining power for the t-test. Power depends on the level of the test, \(\alpha\), the actual true difference in means, and n (the sample size). Figure 2.13 (2.12 in 7th ed) in the text gives the operating characteristic curves where \(\beta\) is calculated for \(n* = 2n - 1\) for an \(\alpha = 0.05\) level test. When you design a study you usually plan for equal sample size, since this gives the highest power in your results. We will look at special cases where you might deviate from this but generally, this is the case.
To use the Figure in the text, we need to first calculate the difference in means measured in numbers of standard deviation, i.e. \(\lvert \mu_1-\mu_2 \rvert / \sigma\). You can think of this as a signal to noise ratio, i.e. how large or strong is the signal, \(\lvert \mu_1-\mu_2 \rvert\), in relation to the variation in the measurements, \(\sigma\) We are not using the symbols in the text, because the 2 editions define d and \(\delta\) differently. Different software packages or operating characteristic curves may require either \(\lvert \mu_1-\mu_2 \rvert / \sigma\) or \(\lvert \mu_1-\mu_2 \rvert / 2 \sigma\) to compute sample sizes or estimate power, so you need to be careful in reading the documentation. Minitab avoids this by asking for \(\lvert \mu_1-\mu_2 \rvert\) and \(\sigma\) separately, which seems like a very sensible solution.
Again,
Example calculations
Let's consider an example in the two sample situation. We will let \(\alpha = .05, |\mu_1 - \mu_2| = 8\) (the difference between the two means), and the sigma (assumed true standard deviation) would equal 12, and finally, let the number of observations in each group n = 5.
In this case, \(\lvert \mu_1-\mu_2 \rvert / \sigma = 8/12 = .66\), and \(n* = 2n - 1 = 9\).
If you look at the Figure you get approximately a \(\beta\) of about 0.9. Therefore, power - or the chance of rejecting the null hypothesis prior to doing the experiment is \(1 - \beta\) or \(1 - 0.9 = 0.1\) or about ten percent of the time. With such low power we should not even do the experiment!
If we were willing to do a study that would only detect a true difference of, let's say, \(\lvert \mu_1-\mu_2 \rvert = 18\) then and n* would still equal 9, then figure 2-12 the Figure shows that \(\beta\) looks to be about .5 and the power or chance of detecting a difference of 18 is also 5. This is still not very satisfactory since we only have a 50/50 chance of detecting a true difference of 18 even if it exists.
Finally, we calculate the power to detect this difference of 18 if we were to use n = 10 observations per group, which gives us \(n* = 19\). For this case \(\beta = 0.1\) and thus \(\text{power} = 1- \beta = 0.9\) or 90%, which is quite satisfactory.
These calculations can also be done in Minitab as shown below. Under the Menu > Stat > Power and Sample Size > 2-sample t, simply input sample sizes, \(n = 10\), differences \(\delta = 18\), and standard deviation \(\sigma = 12\).
Another way to improve power is to use a more efficient procedure - for example, if we have paired observations we could use a paired t-test. For instance, if we used the paired t-test, then we would expect to have a much smaller sigma – perhaps somewhere around 2 rather than 12. So, our signal to noise ratio would be larger because the noise component is smaller. We do pay a small price in doing this because our t-test would now have degrees of freedom \(n - 1\), instead of \(2n - 2\).
The take-home message here is:
If you can reduce variance or noise, then you can achieve an incredible savings in the number of observations you have to collect. Therefore the benefit of a good design is to get a lot more power for the same cost or much-decreased cost for the same power.
We now show another approach to calculating power, namely using software tools rather than a graph. Let's take a look at how Minitab handles this below.
You can use these dialog boxes to plug in the values that you have assumed and have Minitab calculate the sample size for a specified power or the power that would result, for a given sample size.
Try It!
Use the assumptions above, and confirm the calculations of power for these values.