Lesson 3: Experiments with a Single Factor - the Oneway ANOVA - in the Completely Randomized Design (CRD)
Lesson 3: Experiments with a Single Factor - the Oneway ANOVA - in the Completely Randomized Design (CRD)Overview
By the end of this chapter, we will understand how to proceed when the ANOVA tells us that the mean responses differ, (i.e., the levels are significantly different), among our treatment levels. We will also briefly discuss the situation that the levels are a random sample from a larger set of possible levels, such as a sample of brands for a product. We will briefly discuss multiple comparison procedures for qualitative factors, and regression approaches for quantitative factors. These are covered in more detail in the STAT 502 course and discussed only briefly here.
Objectives
Focus more on the design and planning aspects of these situations:
- How many observations do we need?
- to achieve a desired precision when the goal is estimating a parameter, and
- to achieve a desired level of power when hypothesis testing.
- Understanding which multiple comparison procedure is appropriate for your situation
- Be able to allocate our observations among the k treatment groups.
- Understanding that the Dunnett Test situation has a different optimum allocation
- Describes the F-test as an example of the General Linear Test.
3.1 - Experiments with One Factor and Multiple Levels
3.1 - Experiments with One Factor and Multiple LevelsLesson 3 is the beginning of the one-way analysis of variance part of the course, which extends the two sample situation to k samples..
Text Reading: In addition to these notes, read Chapter 3 of the text and the online supplement. (If you have the 7th edition, also read 13.1.)
We review the issues related to a single factor experiment, which we see in the context of a Completely Randomized Design (CRD). In a single factor experiment with a CRD, the levels of the factor are randomly assigned to the experimental units. Alternatively, we can think of randomly assigning the experimental units to the treatments or in some cases, randomly selecting experimental units from each level of the factor.
Example 3-1: Cotton Tensile Strength

This is an investigation into the formulation of synthetic fibers that are used to make cloth. The response is tensile strength, the strength of the fiber. The experimenter wants to determine the best level of the cotton in terms of percent, to achieve the highest tensile strength of the fiber. Therefore, we have a single quantitative factor, the percent of cotton combined with synthetic fabric fibers.
The five treatment levels of percent cotton are evenly spaced from 15% to 35%. We have five replicates, five runs on each of the five cotton weight percentages.
| Cotton Weight Percentage |
Observations | ||||||
|---|---|---|---|---|---|---|---|
| 1 | 2 | 3 | 4 | 5 | Total | Average | |
| 15 | 7 | 7 | 15 | 11 | 9 | 49 | 9.8 |
| 20 | 12 | 17 | 12 | 18 | 18 | 77 | 15.4 |
| 25 | 14 | 18 | 18 | 19 | 19 | 88 | 17.6 |
| 30 | 19 | 25 | 22 | 19 | 23 | 108 | 21.6 |
| 35 | 7 | 10 | 11 | 15 | 11 | 54 | 10.8 |
| 376 | 15.04 | ||||||
The box plot of the results shows an indication that there is an increase in strength as you increase the cotton and then it seems to drop off rather dramatically after 30%.

Makes you wonder about all of those 50% cotton shirts that you buy?!
The null hypothesis asks: does the cotton percent make a difference? Now, it seems that it doesn't take statistics to answer this question. All we have to do is look at the side by side box plots of the data and there appears to be a difference – however, this difference is not so obvious by looking at the table of raw data. A second question, frequently asked when the factor is quantitative: what is the optimal level of cotton if you only want to consider strength?
There is a point that I probably should emphasize now and repeatedly throughout this course. There is often more than one response measurement that is of interest. You need to think about multiple responses in any given experiment. In this experiment, for some reason, we are interested in only one response, tensile strength, whereas in practice the manufacturer would also consider comfort, ductility, cost, etc.
This single factor experiment can be described as a completely randomized design (CRD). The completely randomized design means there is no structure among the experimental units. There are 25 runs which differ only in the percent cotton, and these will be done in random order. If there were different machines or operators, or other factors such as the order or batches of material, this would need to be taken into account. We will talk about these kinds of designs later. This is an example of a completely randomized design where there are no other factors that we are interested in other than the treatment factor percentage of cotton.
Reference: Problem 3.10 of Montgomery (3.8 in the \(7^{th}\) edition)
Analysis of Variance
The Analysis of Variance (ANOVA) is a somewhat misleading name for this procedure. But we call it the analysis of variance because we are partitioning the total variation in the response measurements.
The Model Statement
Each measured response can be written as the overall mean plus the treatment effect plus a random error.
\(Y_{ij} = \mu + \tau_i +\epsilon_{ij}\)
\(i = 1, ... , a,\) and \( j = 1, ... n_i\)
Generally, we will define our treatment effects so that they sum to 0, a constraint on our definition of our parameters,\(\sum \tau_{i}=0\). This is not the only constraint we could choose, one treatment level could be a reference such as the zero level for cotton and then everything else would be a deviation from that. However, generally, we will let the effects sum to 0. The experimental error terms are assumed to be normally distributed, with zero mean and if the experiment has constant variance then there is a single variance parameter \(\sigma^2\). All of these assumptions need to be checked. This is called the effects model.
An alternative way to write the model, besides the effects model, where the expected value of our observation, \(E\left(Y_{i j}\right)=\mu+\tau_{i}\) or an overall mean plus the treatment effect. This is called the means model and is written as:
\(Y_{ij} = \mu +\epsilon_{ij}\)
\(i = 1, ... , a,\) and \( j = 1, ... n_i\)
In looking ahead there is also the regression model. Regression models can also be employed but for now, we consider the traditional analysis of variance model and focus on the effects of the treatment.
Analysis of variance formulas that you should be familiar with by now are provided in the textbook.
The total variation is the sum of the observations minus the overall mean squared, summed over all a × n observations.
The analysis of variance simply takes this total variation and partitions it into the treatment component and the error component. The treatment component is the difference between the treatment mean and the overall mean. The error component is the difference between the observations and the treatment mean, i.e. the variation not explained by the treatments.
Notice when you square the deviations there are also cross-product terms, (see equation 3-5), but these sum to zero when you sum over the set of observations. The analysis of variance is the partition of the total variation into treatment and error components. We want to test the hypothesis that the means are equal versus at least one is different, i.e.
\(H_0 \colon \mu_{1}=\ldots=\mu_{a}\) versus \(H_a \colon \mu_{i} \neq \mu_{i'}\)
Corresponding to the sum of squares (SS) are the degrees of freedom associated with the treatments, \(a - 1\), and the degrees of freedom associated with the error, \(a × (n - 1)\), and finally one degree of freedom is due to the overall mean parameter. These add up to the total \(N = a × n\), when the \(n_i\) are all equal to \(n\), or \( N=\sum n_{i}\) otherwise.
The mean square treatment (MST) is the sum of squares due to treatment divided by its degrees of freedom.
The mean square error (MSE) is the sum of squares due to error divided by its degrees of freedom.
If the true treatment means are equal to each other, i.e. the \(\mu_i\) are all equal, then these two quantities should have the same expectation. If they are different then the treatment component, MST will be larger. This is the basis for the F-test.
The basic test statistic for testing the hypothesis that the means are all equal is the F ratio, MST/MSE, with degrees of freedom, a-1, and a×(n-1) or a-1 and N-a.
We reject \(H_0\) if this quantity is greater than \(1-α\) percentile of the F distribution.
Example 3-1: Continued - Cotton Weight Percent
Here is the Analysis of Variance table from the Minitab output:
One-way ANOVA: Observations versus Cotton Weight %
| Source | DF | SS | MS | F | P |
|---|---|---|---|---|---|
| Cotton Weight % | 4 | 475.76 | 118.94 | 14.76 | 0.000 |
| Error | 20 | 161.20 | 8.06 | ||
| Total | 24 | 636.96 |
| S = 2.839 | R-Sq = 74.69% | R-Sq(adj)=69.63% |
Individual 95% CIs for Mean based on Pooled StDev
| Level | N | Mean | StDev | ------+----------+----------+----------+--- |
|---|---|---|---|---|
| 15 | 5 | 9.800 | 3.347 | (-----*-----) |
| 20 | 5 | 15.400 | 3.130 | (----*----) |
| 25 | 5 | 17.600 | 2.074 | (----*----) |
| 30 | 5 | 21.600 | 2.608 | (----*----) |
| 35 | 5 | 10.800 | 2.864 | (-----*----) |
| ------+----------+----------+----------+--- | ||||
| 10.0 15.0 20.0 25.0 | ||||
Note a very large F statistic that is, 14.76. The p-value for this F-statistic is < .0005 which is taken from an F distribution pictured below with 4 and 20 degrees of freedom.
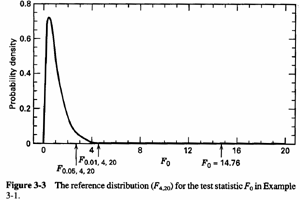
We can see that most of the distribution lies between zero and about four. Our statistic, 14.76, is far out in the tail, obvious confirmation about what the data show, that indeed the means are not the same. Hence, we reject the null hypothesis.
Model Assumption Checking
We should check if the data are normal - they should be approximately normal - they should certainly have constant variance among the groups. Independence is harder to check but plotting the residuals in the order in which the operations are done can sometimes detect if there is lack of independence. The question, in general, is how do we fit the right model to represent the data observed. In this case, there's not too much that can go wrong since we only have one factor and it is a completely randomized design. It is hard to argue with this model.
Let's examine the residuals, which are just the observations minus the predicted values, in this case, treatment means. Hence, \(e_{ij}=y_{ij}-\bar{y}_{i}\).

These plots don't look exactly normal but at least they don't seem to have any wild outliers. The normal scores plot looks reasonable. The residuals versus the order of the data plot are a plot of the error residuals data in the order in which the observations were taken. This looks a little suspect in that the first six data points all have small negative residuals which are not reflected in the following data points. Does this look like it might be a startup problem? These are the kinds of clues that you look for... if you are conducting this experiment you would certainly want to find out what was happening in the beginning.
Post-ANOVA Comparison of Means
So, we found the means are significantly different. Now what? In general, if we had a qualitative factor rather than a quantitative factor we would want to know which means differ from which other ones. We would probably want to do t-tests or Tukey maximum range comparisons, or some set of contrasts to examine the differences in means. There are many multiple comparison procedures.
Two methods, in particular, are Fisher's Least Significant Difference (LSD), and the Bonferroni Method. Both of these are based on the t-test. Fisher's LSD says do an F-test first and if you reject the null hypothesis, then just do ordinary t-tests between all pairs of means. The Bonferroni method is similar but only requires that you decide in advance how many pairs of means you wish to compare, say g, and then perform the g t-tests with a type I level of \(\alpha / g\). This provides protection for the entire family of g tests that the type I error is no more than \(\alpha \). For this setting, with a treatments, g = a(a-1)/2 when comparing all pairs of treatments.
All of these multiple comparison procedures are simply aimed at interpreting or understanding the overall F-test --which means are different? They apply to many situations especially when the factor is qualitative. However, in this case, since cotton percent is a quantitative factor, doing a test between two arbitrary levels e.g. 15% and 20% level, isn't really what you want to know. What you should focus on is the whole response function as you increase the level of the quantitative factor, cotton percent.
Whenever you have a quantitative factor you should be thinking about modeling that relationship with a regression function.
Review the video that demonstrates the use of polynomial regression to help explain what is going on.
Here is the Minitab output where regression was applied:
Polynomial Regression Analysis: Observation versus Cotton Weight %
The regression equations is:
Observations = 62.61 - 9.011 Cotton Weight % + 0.4814 cotton Weight % **2 - 0.007600 Cotton Weight%**3
| S = 3.04839 | R-Sq = 69.4% | R-Sq(sq) = 65.0% |
Analysis of Variance
| Source | DF | SS | MS | F | P |
| Regression | 3 | 441.814 | 147.271 | 15.85 | 0.000 |
| Error | 21 | 195.146 | 9.293 | ||
| Total | 24 | 636.960 |
Sequential Analysis of Variance
| Source | DF | SS | F | P |
| Linear | 1 | 33.620 | 1.28 | 0.269 |
| Quadratic | 1 | 343.214 | 29.03 | 0.000 |
| Cubic | 1 | 64.980 | 6.99 | 0.015 |
Here is a link to the Cotton Weight % dataset (cotton_weight.mwx | cotton_weight.csv). Open this in Minitab so that you can try this yourself.
You can see that the linear term in the regression model is not significant but the quadratic is highly significant. Even the cubic term is significant with p-value = 0.015. In Minitab we can plot this relationship in the fitted line plot as seen below:
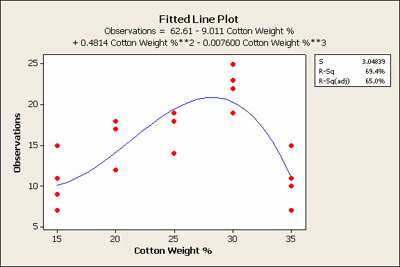
This shows the actual fitted equation. Why wasn't the linear term significant? If you just fit a straight line to this data it would be almost flat, not quite but almost. As a result, the linear term by itself is not significant. We should still leave it in the polynomial regression model, however, because we like to have a hierarchical model when fitting polynomials. What we can learn from this model is that the tensile strength of cotton is probably best between the 25 and 30 weight.
This is a more focused conclusion than we get from simply comparing the means of the actual levels in the experiment because the polynomial model reflects the quantitative relationship between the treatment and the response.
We should also check whether the observations have constant variance \(\sigma^2\), for all treatments. If they are all equal we can say that they are equal to \(\sigma^2\). This is an assumption of the analysis and we need to confirm this assumption. We can either test it with Bartlett's test, the Levene's test, or simply use the 'eye ball' technique of plotting the residuals versus the fitted values and see if they are roughly equal. The eyeball approach is almost as good as using these tests since by testing we cannot ‘prove’ the null hypothesis.
Bartlett's test is very susceptible to non-normality because it is based on the sample variances, which are not robust to outliers. We must assume that the data are normally distributed and thus not very long-tailed. When one of the residuals is large and you square it, you get a very large value which explains why the sample variance is not very robust. One or two outliers can cause any particular variance to be very large. Thus simply looking at the data in a box plot is as good as these formal tests. If there is an outlier you can see it. If the distribution has a strange shape you can also see this in a histogram or a box plot. The graphical view is very useful in this regard.
Levene's test is preferred to Bartlett’s in my view because it is more robust. To calculate the Levene's test you take the observations and obtain (not the squared deviations from the mean but) the absolute deviations from the median. Then, you simply do the usual one way ANOVA F-test on these absolute deviations from the medians. This is a very clever and simple test that has been around for a long time, created by Levene back in the 1950s. It is much more robust to outliers and non-normality than Bartlett's test.
3.2 - Sample Size Determination
3.2 - Sample Size DeterminationAn important aspect of designing an experiment is to know how many observations are needed to make conclusions of sufficient accuracy and with sufficient confidence. We review what we mean by this statement. The sample size needed depends on lots of things; including what type of experiment is being contemplated, how it will be conducted, resources, and desired sensitivity and confidence.
Sensitivity refers to the difference in means that the experimenter wishes to detect, i.e., sensitive enough to detect important differences in the means.
Generally, increasing the number of replications increases the sensitivity and makes it easier to detect small differences in the means. Both power and the margin of error are a function of n and a function of the error variance. Most of this course is about finding techniques to reduce this unexplained residual error variance, and thereby improving the power of hypothesis tests, and reducing the margin of error in estimation.
Hypothesis Testing Approach to Determining Sample Size
Our usual goal is to test the hypothesis that the means are equal, versus the alternative that the means are not equal.
The null hypothesis that the means are all equal implies that the \(\tau_i\)'s are all equal to 0. Under this framework, we want to calculate the power of the F-test in the fixed effects case.
Example 3.2: Blood Pressure
Consider the situation where we have four treatment groups that will be using four different blood pressure drugs, a = 4. We want to be able to detect differences between the mean blood pressure for the subjects after using these drugs.
One possible scenario is that two of the drugs are effective and two are not. e.g. say two of them result in blood pressure at 110 and two of them at 120. In this case the sum of the \(\tau_{i}^{2}\) for this situation is 100, i.e. \(\tau_i = (-5, -5, 5, 5) \) and thus \(\Sigma \tau_{i}^{2}=100\).
Another scenario is the situation where we have one drug at 110, two of them at 115 and one at 120. In this case the sum of the \(\tau_{i}^{2}\) is 50, i.e. \(\tau_i = (-5, 0, 0, 5) \) and thus \(\Sigma \tau_{i}^{2}=50\).
Considering both of these scenarios, although there is no difference between the minimums and the maximums, the quantities \(\Sigma \mathrm{\tau}_{i}^{2}\) are very different.
Of the two scenarios, the second is the least favorable configuration (LFC). It is the configuration of means for which you get the least power. The first scenario would be much more favorable. But generally, you do not know which situation you are in. The usual approach is to not to try to guess exactly what all the values of the \(\tau_i\) will be but simply to specify \(\delta\), which is the maximum difference between the true means, or \(\delta = \text{max}(\tau_i) - \text{min}(\tau_i)\).
Going back to our LFC scenario we can calculate this again using \(\Sigma \tau_{i}^{2} = \delta^{2} /2\), i.e. the maximum difference squared over 2. This is true for the LFC for any number of treatments since \(\Sigma \tau_i^{2} = (\delta/2)^2 \times 2 = \delta^2 \ 2\) since all but the extreme values of \(\tau_i\) are zero under the LFC.
The Use of Operating Characteristic Curves
The OC curves for the fixed effects model are given in the Appendix V.
The usual way to use these charts is to define the difference in the means, \(\delta = \text{max}(\mu_i) - \text{min}(\mu_i)\), that you want to detect, specify the value of \(\sigma^2\), and then for the LFC use :
\(\Phi^2=\dfrac{n\delta^2}{2a\sigma^2}\)
for various values of n. The Appendix V gives \(\beta\), where \(1 - \beta\) is the power for the test where \(\nu_1 = a - 1\) and \(\nu_2 = a(n - 1)\). Thus after setting n, you must calculate \(\nu_1\) and \(\nu_2\) to use the table.
Example: We consider an \(\alpha = 0.05\) level test for \(a = 4\) using \(\delta = 10\) and \(\sigma^2 = 144\) and we want to find the sample size n to obtain a test with power = 0.9.
Let's guess at what our n is and see how this work. Say we let n be equal to 20, let \(\delta = 10\), and \(\sigma = 12\) then we can calculate the power using Appendix V. Plugging in these values to find \(\Phi\) we get \(\Phi = 1.3\).
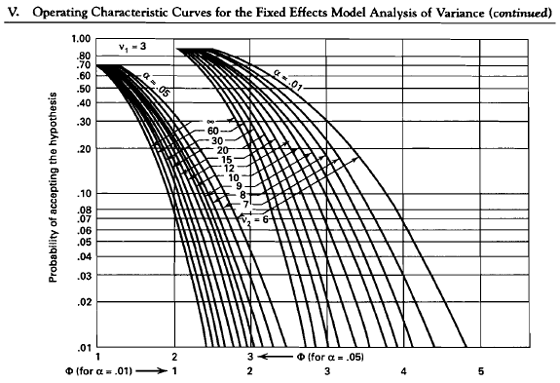
Now go to the chart where \(\nu_2\) is 80 - 4 = 76 and \(\Phi = 1.3\). This gives us a Type II error of \(\beta = 0.45\) and \(\text{power} = 1 - \beta = 0.55\).
It seems that we need a larger sample size.
Well, let's use a sample size of 30. In this case we get \(\Phi^2 = 2.604\), so \(\Phi = 1.6\).
Now with \(\nu_2\) a bit more at 116, we have \(\beta = 0.30\) and power = 0.70.
So we need a bit more than n = 30 per group to achieve a test with power = 0.8.
Review the video below for a 'walk-through' this procedure using Appendix V in the back of the text.
3.3 - Multiple Comparisons
3.3 - Multiple ComparisonsScheffé's Method
Scheffé's method for investigating all possible contrasts of the means corresponds exactly to the F-test in the following sense. If the F-test rejects the null hypothesis at level \(\alpha\), then there exists at least one contrast which would be rejected using the Scheffé procedure at level \(\alpha\). Therefore, Scheffé provides \(\alpha\) level protection against rejecting the null hypothesis when it is true, regardless of how many contrasts of the means are tested.
Fisher's LSD
Fisher’s LSD, which is the F test, followed by ordinary t-tests among all pairs of means, but only if the F-test rejects the null hypothesis. The F-test provides the overall protection against rejecting \(H_0\) when it is true. The t-tests are each performed at \(\alpha\) level and thus likely will reject more than they should, when the F-test rejects. A simple example may explain this statement: assume there are eight treatment groups, and one treatment has a mean higher than the other seven, which all have the same value, and the F-test will reject \(H_0\). However, when following up with the pairwise t-tests, the \(7 \times 6 / 2 = 21\) pairwise t-tests among the seven means which are all equal, will by chance alone reject at least one pairwise hypothesis, \(H_0 \colon \mu_i = \mu_i^{\prime}\) at \(\alpha = 0.05\). Despite this drawback, Fisher's LSD remains a favorite method since it has overall \(\alpha\) level protection, and offers simplicity to understand and interpret.
Bonferroni Method
Bonferroni method for \(g\) comparisons – use \(\alpha / g\)instead of \(\alpha\) for testing each of the \(g\) comparisons.
Comparing the Bonferroni Procedure with the Fishers LSD
Fishers’s LSD method is an alternative to other pairwise comparison methods (for post ANOVA analysis). This method controls the \(\alpha\text{-level}\) error rate for each pairwise comparison so it does not control the family error rate. This procedure uses the t statistic for testing \(H_0 \colon \mu_i = \mu_j\) for all i and j pairs.
\(t=\dfrac{\bar{y}_i-\bar{y}_j}{\sqrt{MSE(\frac{1}{n_i}+\frac{1}{n_j})}}\)
Alternatively, the Bonferroni method does control the family error rate, by performing the pairwise comparison tests using \(_{\alpha/g}\) level of significance, where g is the number of pairwise comparisons. Hence, the Bonferroni confidence intervals for differences of the means are wider than that of Fisher’s LSD. In addition, it can be easily shown that the p-value of each pairwise comparison calculated by Bonferroni method is g times the p-value calculated by Fisher’s LSD method.
Tukey's Studentized Range
Tukey’s Studentized Range considers the differences among all pairs of means divided by the estimated standard deviation of the mean and compares them with the tabled critical values provided in Appendix VII. Why is it called the studentized range? The denominator uses an estimated standard deviation, hence, the statistic is studentized like the student t-test. The Tukey procedure assumes all \(n_i\) are equal say to \(n\).
\(q=\dfrac{\bar{y}_i-\bar{y}_j}{\sqrt{MSE(\frac{1}{n})}}\)
Comparing the Tukey Procedure with the Bonferroni Procedure
The Bonferroni procedure is a good all around tool, but for all pairwise comparisons the Tukey studentized range procedure is slightly better as we show here.
The studentized range is the distribution of the difference between the maximum and a minimum over the standard error of the mean. When we calculate a t-test, or when we're using the Bonferroni adjustment where g is the number of comparisons, we are not comparing apples and oranges. In one case (Tukey) the statistic has a denominator with the standard error of a single mean and in the other case (t-test) with the standard error of the difference between means as seen in the equation for t and q above.
Example 3.3: Tukey vs. Bonferroni approaches
Here is an example we can work out. Let's say we have 5 means, so a = 5, we will let \(\alpha = 0.05\), and the total number of observations N = 35, so each group has seven observations and df = 30.
If we look at the studentized range distribution for 5, 30 degrees of freedom, we find a critical value of 4.11.
If we took a Bonferroni approach - we would use \(g = 5 × 4 / 2 = 10\) pairwise comparisons since a = 5. Thus, again for an α = 0.05 test all we need to look at is the t-distribution for \(\alpha / 2g = 0.0025\) and N - a =30 df. Looking at the t-table we get the value 3.03. However, to compare with the Tukey Studentized Range statistic, we need to multiply the tabled critical value by \(\sqrt{2} = 1.414\), therefore 3.03 x1.414 = 4.28, which is slightly larger than the 4.11 obtained for the Tukey table.
The point that we want to make is that the Bonferroni procedure is slightly more conservative than the Tukey result since the Tukey procedure is exact in this situation whereas Bonferroni only approximate.
The Tukey's procedure is exact for equal samples sizes. However, there is an approximate procedure called the Tukey-Kramer test for unequal \(n_i\).
If you are looking at all pairwise comparisons then Tukey's exact procedure is probably the best procedure to use. The Bonferroni, however, is a good general procedure.
Contrasts of Means
A pairwise comparison is just one example of a contrast of the means. A general contrast can be written as a set of coefficients of the means that sum to zero. This will often involve more than just a pair of treatments. In general, we can write a contrast to make any comparison we like. We will also consider sets of orthogonal contrasts.
Example 3.4: Gas Mileage
We want to compare the gas mileage on a set of cars: Ford Escape (hybrid), Toyota Camry, Toyota Prius (hybrid), Honda Accord, and the Honda Civic (hybrid). A consumer testing group wants to test each of these cars for gas mileage under certain conditions. They take n prescribed test runs and record the mileage for each vehicle.
Now they first need to define some contrasts among these means. Contrasts are the coefficients which provide a comparison that is meaningful. Then they can test and estimate these contrasts. For the first contrast, \(C_1\), they could compare the American brand to the foreign brands. We need each contrast to sum to 0, and for convenience only use integers. How about comparing Toyota to Honda (that is \(C_2\)), or hybrid compared to non-hybrid (that is \(C_3\)).
| Ford Escape | Toyota Camry | Toyota Prius | Honda Accord | Honda Civic | |
|---|---|---|---|---|---|
| \(Y_{1.}\) | \(Y_{2.}\) | \(Y_{3.}\) | \(Y_{4.}\) | \(Y_{5.}\) | |
| \(C_1\) | 4 | -1 | -1 | -1 | -1 |
| \(C_2\) | 0 | -1 | -1 | 1 | 1 |
| \(C_3\) | 2 | -3 | 2 | -3 | 2 |
| \(C_4\) | 0 | -1 | 1 | 0 | 0 |
| \(C_5\) | 0 | 0 | 0 | -1 | 1 |
So the first three contrast coefficients would specify the comparisons described, and the \(C_4\) and \(C_5\) are comparisons within the brands with two models.
After we develop a set of contrasts, we can then test these contrasts or we can estimate them. We can also calculate a confidence intervals around the true contrast of the means by using the estimated contrast ± the t-distribution times the estimated standard deviation of the contrast. See equation 3-30 in the text.
Concerning Sets of Multiple Contrasts
Scheffé’s Method provides \(\alpha\text{-level}\) protection for all possible contrasts - especially useful when we don't really know how many contrasts we will have in advance. This test is quite conservative because this test is valid for all possible contrasts of the means. Therefore the Scheffé procedure is equivalent to the F-test, and if the F-test rejects, there will be some contrast that will not contain zero in its confidence interval.
What is an orthogonal contrast?
Two contrasts are orthogonal if the sum of the product of the coefficients of the two contrasts sum to zero. An orthogonal set of contrasts are also orthogonal to the overall mean, since the coefficients sum to zero.
Look at the table above and locate which contrasts are orthogonal.
There always exists a-1 orthogonal contrasts of a means. When the sample sizes are equal, the sum of squares for these contrasts, when added up, total the sum of squares due to treatment. Any set of orthogonal contrasts partition the variation such that the total variation corresponding to those a-1 contrasts equals the total sum of squares among treatments. When the sample sizes are not equal, the definition of orthogonal contrasts involves the sample sizes.
Dunnett's Procedure
Dunnett’s procedure is another multiple comparison procedure specifically designed to compare each treatment to a control. If we have a groups, let the last one be a control group and the first a - 1 be treatment groups. We want to compare each of these treatment groups to this one control. Therefore, we will have a - 1 contrasts or a - 1 pairwise comparisons. To perform multiple comparisons on these a - 1 contrasts we use special tables for finding hypothesis test critical values, derived by Dunnett.
Comparing Dunnett’s procedure to the Bonferroni procedure
We can compare the Bonferroni approach to the Dunnett procedure. The Dunnett procedure calculates the difference of means for the control versus treatment one, control versus treatment two, etc. to a - 1. Which provides a - 1 pairwise comparisons.
So, we now consider an example where we have six groups, a = 6, and t = 5 and n = 6 observations per group. Then, Dunnett's procedure will give the critical point for comparing the difference of means. From the table, we get \(\alpha =0.05\) two-sided comparison d(a-1, f) = 2.66, where a - 1 = 5 and f = df = 30.
Using the Bonferroni approach, if we look at the t-distribution for g = 5 comparisons and a two-sided test with 30 degrees of freedom for error we get 2.75.
Comparing the two, we can see that the Bonferroni approach is a bit more conservative. The Dunnett's is an exact procedure for comparing a control to a-1 treatments. Bonferroni is a general tool but not exact. However, there is not much of a difference in this example
Fisher's LSD has the practicality of always using the same measuring stick, the unadjusted t-test. Everyone knows that if you do a lot of these tests, that for every 20 tests you do, that one could be wrong by chance. This is another way to handle this uncertainty. All of these methods are protecting you from making too many Type I errors whether you are either doing hypothesis testing or confidence intervals. In your lifetime how many tests are you going to do?
So in a sense, you have to ask yourself the question of what is the set of tests that I want to protect against making a Type I error. So, in Fisher's LSD procedure each test is standing on its own and is not really a multiple comparisons test. If you are looking for any type of difference and you don't know how many you are going to end up doing, you should probably be using Scheffé to protect you against all of them. But if you know it is all pairwise and that is it, then Tukey's would be best. If you're comparing a bunch of treatments against a control then Dunnett's would be best.
There is a whole family of step-wise procedures which are now available, but we will not consider them here. Each can be shown to be better in certain situations. Another approach to this problem is called False Discovery Rate control. It is used when there are hundreds of hypotheses - a situation that occurs for example in testing gene expression of all genes in an organism, or differences in pixel intensities for pixels in a set of images. The multiple comparisons procedures discussed above all guard against the probability of making one false significant call. But when there are hundreds of tests, we might prefer to make a few false significant calls if it greatly increases our power to detect the true difference. False Discovery Rate methods attempt to control the expected percentage of false significant calls among the tests declared significant.
3.4 - The Optimum Allocation for the Dunnett Test
3.4 - The Optimum Allocation for the Dunnett TestThe Dunnett test for comparing means is a multiple comparison procedure but is precisely designed to test t treatments against a control.
We compared the Dunnett test to the Bonferroni - and there was only a slight difference, reflecting the fact that the Bonferroni procedure is an approximation. This is a situation where we have a = t + 1 groups; a control group and t treatments.
I like to think of an example where we have a standard therapy, (a control group), and we want to test t new treatments to compare them against the existing acceptable therapy. This is a case where we are not so much interested in comparing each of the treatments against each other, but instead, we are interested in finding out whether each of the new treatments is better than the original control treatment.
We have \(Y_ij\) distributed with mean \(\mu_i\), and variance \(\sigma^{2}\), where \(i = 1, \dots , t, \text{ and } j = 1, \dots , n_i\) for the t treatment groups and a control group with mean \(\mu_0\) with variance \(\sigma^2\).
We are assuming equal variance among all treatment groups.
The question that I want to address here is the design question.
The Dunnett procedure is based on t comparisons for testing \(H_0\) that \(\mu_i = \mu_0\), for \(i = 1, \dots , t\). This is really t different tests where t = a - 1.
The \(H_A\) is that the \(\mu_i\) are not equal to \(\mu_0\).
Or viewing this as an estimation problem, we want to estimate the t differences \(\mu_i = \mu_0\).
How Should We Allocate Our Observations?
This is the question we are trying to answer. We have a fixed set of resources and a budget that only allows for only N observations. So, how should we allocate our resources?
Should we assign half to the control group and the rest spread out among the treatments? Or, should we assign an equal number of observations among all treatments and the control? Or what?
We want to answer this question by seeing how we can maximize the power of these tests with the N observations that we have available. We approach this using an estimation approach where we want to estimate the t differences \(\mu_i - \mu_0\). Let's estimate the variance of these differences.
What we want to do is minimize the total variance. Remember that the variance of \((\bar{y}_i-\bar{y}_0)\) is \(\sigma^{2} / n_i + \sigma^{2} / n_0\). The total variance is the sum of these t parts.
We need to find \(n_0\), and \(n_i\) that will minimize this total variance. However, this is subject to a constraint, the constraint being that \(N = n_0 + (t \times n)\), if the \(n_i = n\) for all treatments, an assumption we can reasonably make when all treatments are of equal importance.
Given N observations and a groups, where \(a = t + 1\):
the model is:
\(y_{ij} = \mu_i + \epsilon_{ij}\), where \(i = 0, 1, \dots , t\) and \(j = 1, \dots , n_i\)
sample mean: \(\bar{y}_{i.}=\dfrac{1}{n_i} \sum\limits_j^{n_i} y_{ij}\) and \(Var(\bar{y}_{i.})=\dfrac{\sigma^2}{n_i}\)
Furthermore, \(Var(\bar{y}_{i.}-\bar{y}_0)=\dfrac{\sigma^2}{n_i}+\dfrac{\sigma^2}{n_0}\)
Use \(\hat{\sigma}^2=MSE\) and assume \(n_i= n\) for \(i = 1, \dots , t\).
Then the Total Sample Variance (TSV) = \((TSV)=\sum\limits_{i=1}^t \widehat{var} (\bar{y}_{i.}-\bar{y}_{0.})=t(\dfrac{\sigma^2}{n}+\dfrac{\sigma^2}{n_0})\)
We want to minimize \(t\sigma^2(\frac{1}{n}+\frac{1}{n_0})\) where \(N = tn + n_0\)
This is a LaGrange multiplier problem (calculus): \(\text{min} {TSV + \lambda(N - tn - n_0}\):
Solve:
1) \(\dfrac{\partial(\ast)}{\delta n}=\dfrac{-t\sigma^2}{n^2}-\lambda t=0\)
2) \(\dfrac{\partial(\ast)}{\partial n_0}=\dfrac{-t\sigma^2}{n_0^2}-\lambda =0\)
From 2) \(\lambda=\dfrac{-t\sigma^2}{n_0^2}\) we can then substitute into 1) as follows:
\(\dfrac{-t\sigma^2}{n^2}=\lambda t=\dfrac{-t\sigma^2}{n_0^2}
\Longrightarrow n^2=\dfrac{n_0^2}{t}
\Longrightarrow n=\dfrac{n_0}{\sqrt{t}}
\Longrightarrow n_0=n \sqrt{t}\)
Therefore, from \(N=tn+n_0=tn+\sqrt{t} n=n(t+\sqrt{t})\Longrightarrow n=\dfrac{N}{(t+\sqrt{t})}\)
When this is all worked out we have a nice simple rule to guide our decision about how to allocate our observations:
\(n_{0}=n\sqrt{t}\)
Or, the number of observations in the control group should be the square root of the number of treatments times the number of observations in the treatment groups.
If we want to get the exact n based on our resources, let \(n=N/(t+\sqrt{t})\) and \(n_{0}=\sqrt{t}\times n\) and then round to the nearest integers.
Back to our example...
In our example, we had N = 60 and t = 4. Plugging these values into the equation above gives us \(n = 10\) and \(n_0 = 20\). We should allocate 20 observations in the control and 10 observations in each of the treatments. The purpose is not to compare each of the new drugs to each other but rather to answer whether or not the new drug is better than the control.
These calculations demonstrate once again, that the design principles we use in this course are almost always based on trying to minimize the variance and maximizing the power of the experiment. Here is a case where equal allocation is not optimal because you are not interested equally in all comparisons. You are interested in specific comparisons i.e. treatments versus the control, so the control takes on special importance. In this case, we allocate additional observations to the control group for the purpose of minimizing the total variance.
3.5 - One-way Random Effects Models
3.5 - One-way Random Effects ModelsWith quantitative factors, we may want to make inference to levels not measured in the experiment by interpolation or extrapolation on the measurement scale. With categorical factors, we may only be able to use a subset of all possible levels - e.g. brands of popcorn - but we would still like to be able to make inference to other levels. Imagine that we randomly select a of the possible levels of the factor of interest. In this case, we say that the factor is random. As before, the usual single factor ANOVA applies which is
\(y_{ij}=\mu +\tau_i+\varepsilon_{ij}
\left\{\begin{array}{c}
i=1,2,\ldots,a \\
j=1,2,\ldots,n
\end{array}\right. \)
However, here both the error term and treatment effects are random variables, that is
\(\varepsilon_{ij}\ \mbox{is }NID(0,\sigma^2)\mbox{ and }\tau_i\mbox{is }NID(0,\sigma^2_{\tau})\)
Also, \(\tau_i\) and \(\epsilon_{ij}\) are independent. The variances \(\sigma^2_{\tau} \) and \(\sigma^2\) are called variance components.
In the fixed effect models we test the equality of the treatment means. However, this is no longer appropriate because treatments are randomly selected and we are interested in the population of treatments rather than any individual one. The appropriate hypothesis test for a random effect is:
\(H_0:\sigma^2_{\tau}=0\)
\(H_1:\sigma^2_{\tau}>0\)
The standard ANOVA partition of the total sum of squares still works and leads to the usual ANOVA display. However, as before, the form of the appropriate test statistic depends on the Expected Mean Squares. In this case, the appropriate test statistic would be
\(F_0=MS_{Treatments}/MS_E\)
which follows an F distribution with a-1 and N-a degrees of freedom. Furthermore, we are also interested in estimating the variance components \(\sigma_{t}^{2}\) and \(\sigma^2\). To do so, we use the analysis of variance method which consists of equating the expected mean squares to their observed values.
\({\hat{\sigma}}^2=MS_E\ \mbox{and}\ {\hat{\sigma}}^2+n{\hat{\sigma}}^2_{\tau}=MS_{Treatments}\)
\({\hat{\sigma}}^2_{\tau}=\dfrac{MS_{Treatment}-MS_E}{n}\)
\({\hat{\sigma}}^2=MS_E\)
A potential problem that may arise here is that the estimated treatment variance component may be negative. It such a case, it is proposed to either consider zero in case of a negative estimate or use another method which always results in a positive estimate. A negative estimate for the treatment variance component can also be viewed as evidence that the model is not appropriate, which suggests looking for a better one.
Example 3.11 (13.1 in the 7th ed) discusses a single random factor case about the differences among looms in a textile weaving company. Four looms have been chosen randomly from a population of looms within a weaving shed and four observations were made on each loom. Table 13.1 illustrates the data obtained from the experiment. Here is the Minitab output for this example using Stat > ANOVA > Balanced ANOVA command.
| Factor | Type | Levels | Values |
|---|---|---|---|
| Loom | random | 4 | 1 2 3 4 |
| Analysis of Variance for y | |||
| Source | DF | SS | MS | F | P |
|---|---|---|---|---|---|
| Loom | 3 | 89.188 | 29.729 | 15.68 | 0.000 |
| Error | 12 | 22.750 | 1.896 | ||
| Total | 15 | 111.938 |
| Source | Variance component |
Error term |
Expected Mean Square for Each Term (using unrestricted model) |
|---|---|---|---|
| 1 Loom | 6.958 | 2 | (2) + 4(1) |
| 2 Error | 1.896 | (2) |
The interpretation made from the ANOVA table is as before. With the p-value equal to 0.000 it is obvious that the looms in the plant are significantly different, or more accurately stated, the variance component among the looms is significantly larger than zero. And confidence intervals can be found for the variance components. The \(100(1-\alpha)\%\) confidence interval for \(\alpha^2\) is
\(\dfrac{(N-a)MS_E}{\chi^2_{\alpha/2,N-a}} \leq \sigma^2 \leq \dfrac{(N-a)MS_E}{\chi^2_{1-\alpha/2,N-a}}\)
Confidence intervals for other variance components are provided in the textbook. It should be noted that a closed form expression for the confidence interval on some parameters may not be obtained.
3.6 - The General Linear Test
3.6 - The General Linear TestThis is just a general representation of an F-test based on a full and a reduced model. We will use this frequently when we look at more complex models.
Let's illustrate the general linear test here for the single factor experiment:
First we write the full model, \(Y_{ij} = \mu + \tau_i + \epsilon_{ij}\) and then the reduced model, \(Y_{ij} = \mu + \epsilon_{ij}\) where you don't have a \(\tau_i\) term, you just have an overall mean, \(\mu\). This is a pretty degenerate model that just says all the observations are just coming from one group. But the reduced model is equivalent to what we are hypothesizing when we say the \(\mu_i\) would all be equal, i.e.:
\(H_0 \colon \mu_1 = \mu_2 = \dots = \mu_a\)
This is equivalent to our null hypothesis where the \(\tau_i\)'s are all equal to 0.
The reduced model is just another way of stating our hypothesis. But in more complex situations this is not the only reduced model that we can write, there are others we could look at.
The general linear test is stated as an F ratio:
\(F=\dfrac{(SSE(R)-SSE(F))/(dfR-dfF)}{SSE(F)/dfF}\)
This is a very general test. You can apply any full and reduced model and test whether or not the difference between the full and the reduced model is significant just by looking at the difference in the SSE appropriately. This has an F distribution with (df R - df F), df F degrees of freedom, which correspond to the numerator and the denominator degrees of freedom of this F ratio.
Let's take a look at this general linear test using Minitab...
Example 3.5: Cotton Weight

Remember this experiment had treatment levels 15, 20, 25, 30, 35 % cotton weight and the observations were the tensile strength of the material.
The full model allows a different mean for each level of cotton weight %.
We can demonstrate the General Linear Test by viewing the ANOVA table from Minitab:
STAT > ANOVA > Balanced ANOVA
The \(SSE(R) = 636.96\) with a \(dfR = 24\), and \(SSE(F) = 161.20\) with \(dfF = 20\). Therefore:
\(F^\ast =\dfrac{(636.96-161.20)/(24-20)}{161.20/20}\)
This demonstrates the equivalence of this test to the F-test. We now use the General Linear Test (GLT) to test for Lack of Fit when fitting a series of polynomial regression models to determine the appropriate degree of polynomial.
We can demonstrate the General Linear Test by comparing the quadratic polynomial model (Reduced model), with the full ANOVA model (Full model). Let \(Y_{ij} = \mu + \beta_{1}x_{ij} + \beta_{2}x_{ij}^{2} + \epsilon_{ij}\) be the reduced model, where \(x_{ij}\) is the cotton weight percent. Let \(Y_{ij} = \mu + \tau_i + \epsilon_{ij}\) be the full model.
The General Linear Test - Cotton Weight Example (no sound)
The video above shows the SSE(R) = 260.126 with dfR = 22 for the quadratic regression model. The ANOVA shows the full model with SSE(F) = 161.20 with dfF = 20.
Therefore the GLT is:
\(\begin{eqnarray} F^\ast &=&\dfrac{(SSE(R)-SSE(F))/(dfR-dfF)}{SSE(F)/dfF} \nonumber\\ &=&\dfrac{(260.126-161.200)/(22-20)}{161.20/20}\nonumber\\ &=&\dfrac{98.926/2}{8.06}\nonumber\\ &=&\dfrac{49.46}{8.06}\nonumber\\&=&6.14 \nonumber \end{eqnarray}\)
We reject \(H_0\colon \) Quadratic Model and claim there is Lack of Fit if \(F^{*} > F_{1}-\alpha (2, 20) = 3.49\).
Therefore, since 6.14 is > 3.49 we reject the null hypothesis of no Lack of Fit from the quadratic equation and fit a cubic polynomial. From the viewlet above we noticed that the cubic term in the equation was indeed significant with p-value = 0.015.
We can apply the General Linear Test again, now testing whether the cubic equation is adequate. The reduced model is:
\(Y_{ij} = \mu + \beta_{1}x_{ij} + \beta_{2}x_{ij}^{2} + \beta_{3}x_{ij}^{3} + \epsilon_{ij}\)
and the full model is the same as before, the full ANOVA model:
\(Y_ij = \mu + \tau_i + \epsilon_{ij}\)
The General Linear Test is now a test for Lack of Fit from the cubic model:
\begin{aligned} F^{*} &=\frac{(\operatorname{SSE}(R)-\operatorname{SSE}(F)) /(d f R-d f F)}{\operatorname{SSE}(F) / d f F} \\ &=\frac{(195.146-161.200) /(21-20)}{161.20 / 20} \\ &=\frac{33.95 / 1}{8.06} \\ &=4.21 \end{aligned}
We reject if \(F^{*} > F_{0.95} (1, 20) = 4.35\).
Therefore we do not reject \(H_A \colon\) Lack of Fit and conclude the data are consistent with the cubic regression model, and higher order terms are not necessary.